This article may currently be obsolete as it has not been updated since 2018.
On 30th of March 2016 hell officially froze. Microsoft, the eternal rival of the open source movement, has officially announced that form now on you can run Linux apps on Windows! Just like that.
Those of you who are in IT for years may recall a famous sentence Steve Ballmer, former CEO of Microsoft, said in 2001. He called Linux a “cancer that attaches itself in an intellectual property sense to everything it touches”.
Well, times have changed, and so have the large companies.
Yeah, but who cares about some new geeky stuff in Windows?
For those of you who are reading this and aren’t techies, let me give you some background.
Nowadays, when you create a project, build an application or a startup, you likely run it in a cloud and your customers use it either on desktops in a web browser or as an application on theirs smartphones, tablets, etc. More and more stuff is being moved to cloud and used via Internet.
Now, to build all these amazing and often useless apps you need tools, and it happened that vast majority of these tools are open source and primarily built for Linux in mind. Simply speaking, trying to build web or cloud based applications on Windows was either no go or at least a serious pain in the a** till 30th of March 2016.
From business perspective, it means that you or your employees no longer need to buy shiny yet overpriced Mac because “you need a terminal and SSH” and “ability to run MS Office”, neither you need to sacrifice lots of productivity software like Photoshop and work exclusively on Linux that doesn’t support most of it.
You can now have it all on your Windows PC and so this post is about how you can actually do it.

Having years of mileage on Linux, I’ve spent last couple of months working primarily from a Windows 10 laptop, ThinkPad T460, using Bash on Windows and can share some experience here – what works, what almost works, and what doesn’t – from a developer perspective, and I tell you, what Microsoft did is pretty awesome.
This is going to be a rather lengthy post so here is the table of contents, you can freely skip to whatever interests you the most.
Part I
- Prerequisites
- Installing Bash on Windows (WSL)
- Getting a decent terminal
- Running Linux desktop apps with X server on Windows
- Docker with WSL
- Vagrant with WSL
Part II
- Share environment between Windows and WSL
- Getting basic Linux utilities and services
- LAMP stack for PHP development
- MEAN stack for Node.js development
- Python, Django and Machine Learning
- Java and JVM ecosystem
- DevOps tools for Amazon AWS
- Things that suck
- Hot or not?
Prerequisites
Well, you’ll need Windows, but not just any Windows but Windows 10 and precisely build 1709, the Fall Creators Update.
You can try on earlier versions like 1703 The Anniversary Update but it might not work. I’m using Windows 10 Pro 64bit build 1709 which you can get here
https://www.microsoft.com/en-us/software-download/windows10.
How can you check what Windows version are you on?
Type winverin the start menu and hit enter, a popup should appear with details about your Windows build.
Installing Bash on Windows (WSL)
Once you’re on the right Windows 10 build, you can install Bash on Windows aka Windows Subsystem for Linux.
- Run Powershell as Admin and run the following
Enable-WindowsOptionalFeature -Online -FeatureName Microsoft-Windows-Subsystem-Linux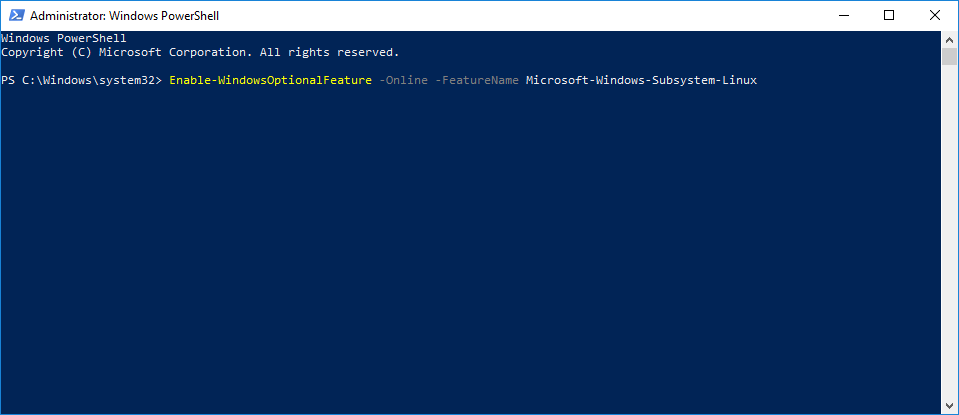
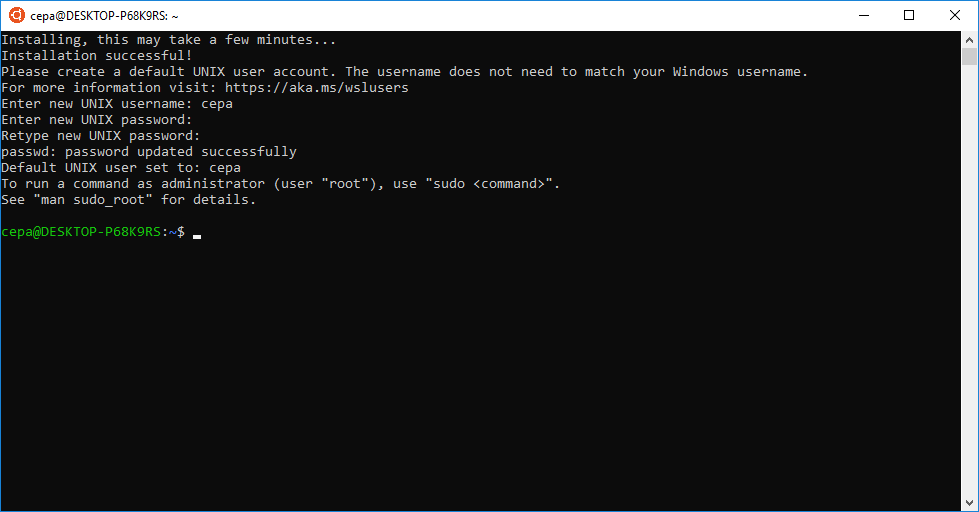
- Go to Windows store and search for Ubuntu and install it
(commands in next sections will work on Ubuntu but won’t on other Linux distros)
- Type cmd in the start menu and run bash to create your WSL Username and Password
- Start bash by typing cmd in the start menu, next bash, hit enter and next and update Linux packages by typing
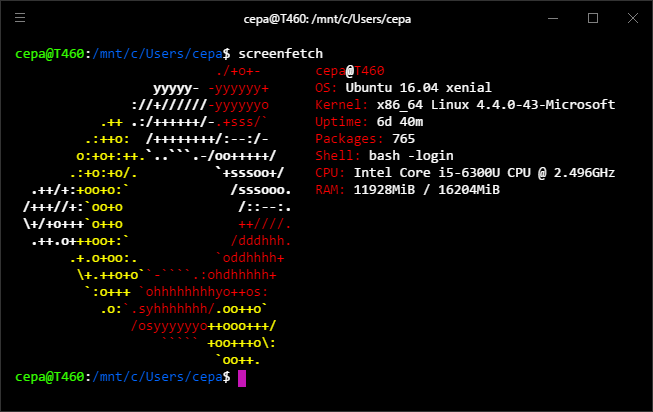
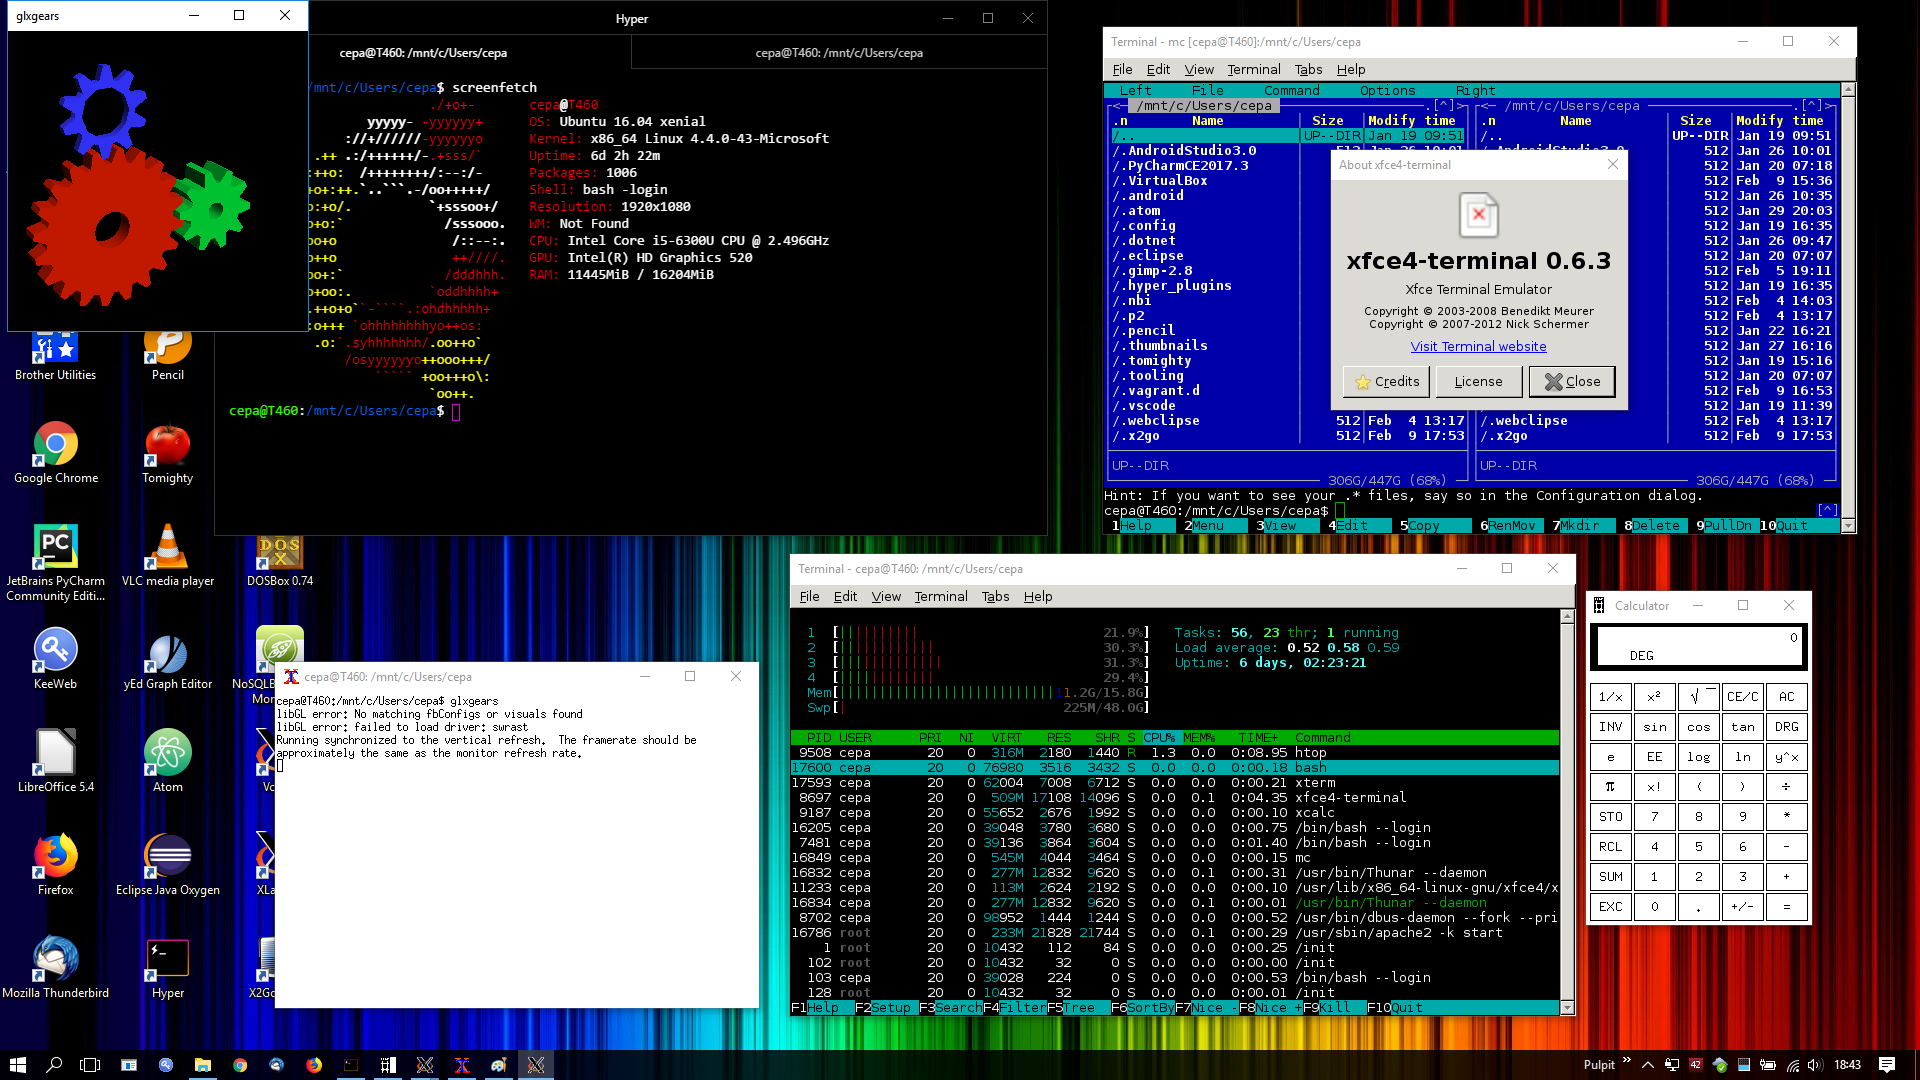
sudo apt-get update - Install screenfetch (optional) and enjoy (must have)
sudo apt install screenfetch; screenfetch
Getting a decent terminal
You have a bunch of options:
My personal favourite is Windows terminal that works suprisingly well (2022).
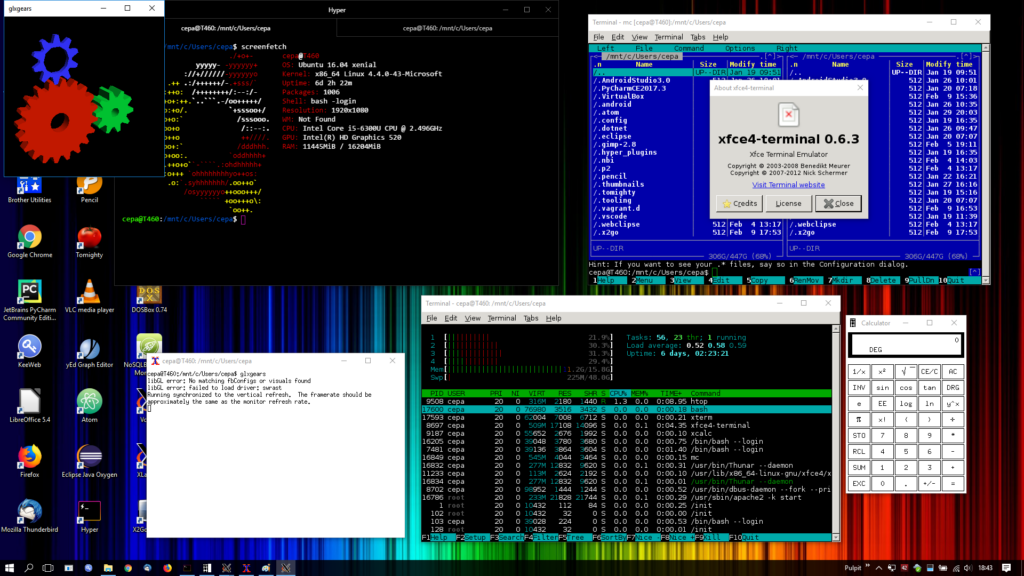
Hyper, presented above, offers the most seamless and Linux-like experience from the list above. Okay, it is an Electron based app and it’s a bit sluggish but works well, scales well and looks like it’s 2018. It’s worth mentioning that the default Windows builtin cmd supports rendering of terminal applications including these written in ncurses like htop or mc.
However, you can also use a real terminal emulator from Linux, like Xfce4 Terminal app… keep reading .
Running Linux desktop apps with X server on Windows
Most likely, you’ll never need this, but if you really want to show off to your colleagues at work or wherever, here it goes.
First, how does Linux desktop work?
Long story short, displaying a graphical interface on Linux is based on a networking protocol called the X. There is the X server and X clients. The X client is any application that connects to the X server to display a window, a button, an image, etc… Because it is based on a network protocol it means your app can run on one computer and be displayed on a monitor connected to another computer, and that’s precisely what we are going to do now.
Second, get yourself an X server.
There are a few options for Windows:
Let’s use the first one, VcXsrv, as it is the least hassle. You can download it here and simply install it on your Windows box just like any other program.
Once installed simply run it, a small icon in your taskbar with an ugly X letter should appear, that’s all.
Third, tell your WSL where the X server is.
Linux apps use environmental variable DISPLAY to connect to the so called active X session, the simplest way to use it is to set DISPLAY=:0 which means the X server runs on the local computer, type this in bash:export DISPLAY=:0
You can also do this to get this variable loaded everytime you start bash.echo "export DISPLAY=:0" >> ~/.bashrc
It will append to the .bashrc file to set that environmental variable for you and this file is loaded everytime you run bash.
Fourth, install some native X applications.
For example you can run Xfce4 Terminal, which also is a decent alternative for handling bash on Windows:sudo apt-get install xfce4-terminalxfce4-terminal &
Displaying Linux apps from remote servers
Interestingly, since you can run X server locally on Windows, you can easily use it to display graphical apps from remote Linux servers.
To do so simply use good ol’ SSH X forwarding, however, I had to change the DISPLAY variable to make it work, use your Windows host IP address.
export DISPLAY=192.168.123.45:0ssh -X user@some.serverxterm &
You should quickly get something like this displayed:

Docker with WSL
What’s the point of Linux’izing Windows if you can’t run one of the most popular development and devops tools, Docker?
Sadly, Docker is not natively supported on WSL, at least not yet. You can install Docker software on WSL but the daemon running containers simply will not start as WSL is not real Linux.
Fortunately, you can easily use Docker on Windows and command it from bash (WSL), that includes the docker program and docker-compose. There are some tradeoffs though. Docker on Windows runs in a virtual machine hosted in Hyper-V hypervisor built into Windows. Unfortunately, Hyper-V doesn’t go well along with other virtualization software like VirtualBox or VMware. So if you plan to use Docker only it’s fine, but if you want to run other virtualization software you’ll need to find a workaround.
So, Docker with WSL:
- Install Docker CE on Windows first.
You can get it here https://www.docker.com/community-edition
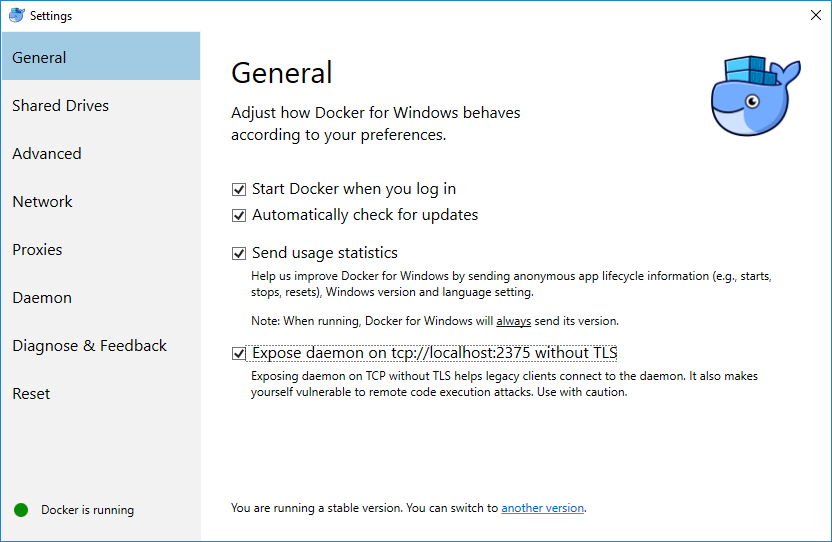
It will cause your computer to restart a couple of times and will enable Hyper-V so bear that in mind. - Start Docker on Windows and enable listening on http://localhost:2375. It will disable Docker’s TLS security so be aware of that!
- Install Docker in WSL.
Go to https://docs.docker.com/install/linux/docker-ce/ubuntu/ for a detailed instruction, simplified version is here:sudo apt-get updatesudo apt-get install apt-transport-https ca-certificates curl software-properties-commoncurl -fsSL https://download.docker.com/linux/ubuntu/gpg | sudo apt-key add -sudo add-apt-repository \ "deb [arch=amd64] https://download.docker.com/linux/ubuntu \ $(lsb_release -cs) \ stable"sudo apt-get updatesudo apt-get install docker-ce - Test if docker command works (it won’t)
docker ps - Configure Docker in WSL to use Docker on Windows host export
DOCKER_HOST=tcp://0.0.0.0:2375 - Set the same in your .bashrc
echo "export DOCKER_HOST=tcp://0.0.0.0:2375" >> ~/.bashrc - Run docker command again (should work now)
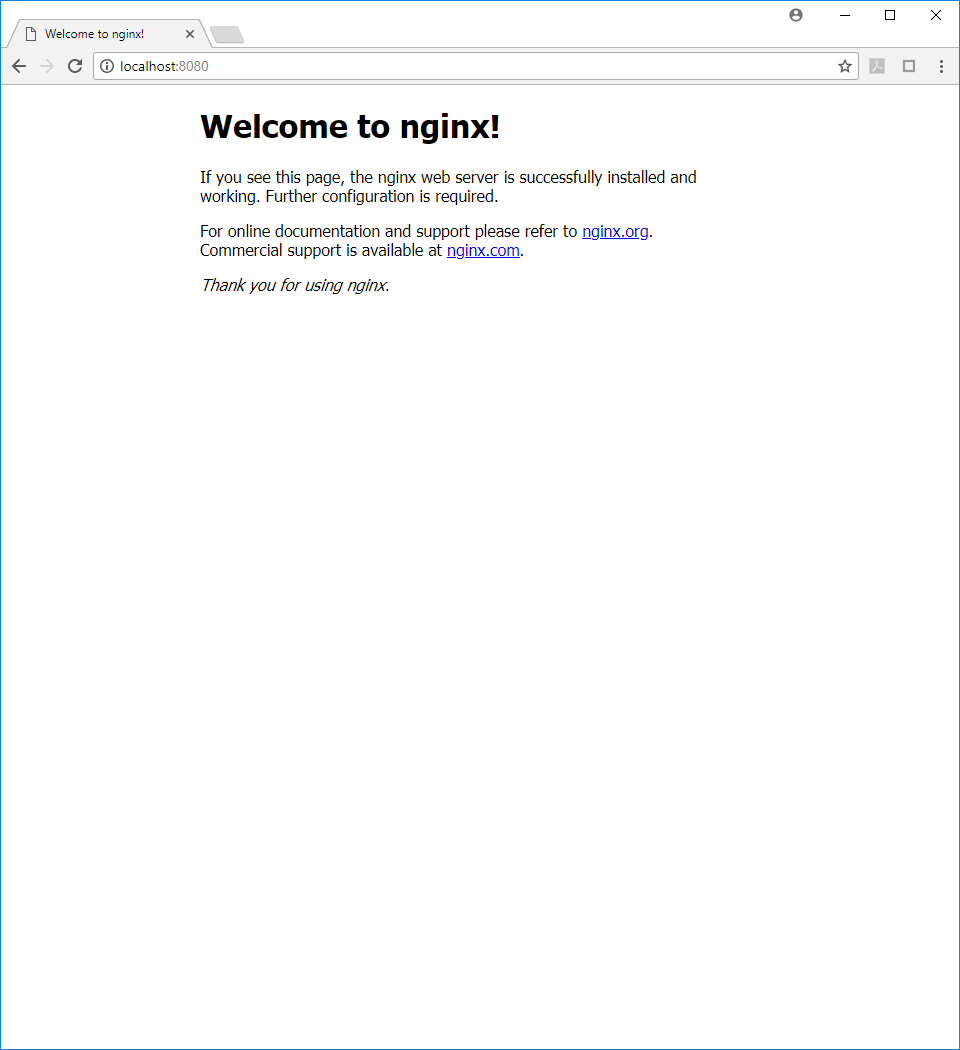
docker ps - Start a container, let’s try with Nginx web server
docker run --name nginx -p 8080:80 -d nginx - Open http://localhost:8080 on your Windows browser
Now, if you need Docker Compose you can easily install it in WSL this way:
sudo apt-get install python python-dev python-setuptoolssudo easy_install pipsudo pip install docker-compose
With regards to the Docker virtualization workaround, you might try with running a custom VirtualBox or VMware virtual machine with Docker daemon on it in the host-only network, that should work similarly to the default MobyLinuxVM on Hyper-V.
Vagrant with WSL
Vagrant is an amazingly useful automation tool for running a project specific virtual machines directly in your project’s folder. Basically, it allows to build and run software in an isolated virtual machine.
(Before you start playing with Vagrant on WSL you should turn of Hyper-V if you had installed Docker previously)
But, why run Vagrant if you have WSL?
Again, isolation, with Vagrant you get a real Linux and it works on most operating systems so you can have your entire development environment completely isolated from your host environment and that resembles real production environment.
Detailed instruction how to install Vagrant is there https://www.vagrantup.com/docs/other/wsl.html
Quick one:
- Install VirtualBox on Windows
Download VirtualBox for Windows from https://www.virtualbox.org/wiki/Downloads - You need to add the VBoxManage.exe location from your VirtualBox installation folder to the global PATH variable.
Do to so, go to the My Computer -> Settings -> Advanced System Settings -> Advanced -> Environment Variables and add the folder path to the PATH variable, usually C:\Program Files\Oracle\VirtualBox - Make sure the path works, open a new bash prompt and run:
VBoxManage.exe
It should print out the default list of parameters, etc. - Install Vagrant in WSL
Go to the Vagrant download page https://www.vagrantup.com/downloads.html and select Debian 64-bit, download it to a folder available in WSL and install by running:sudo dpkg -i vagrant_2.0.2_x86_64.deb - Add the VAGRANT_WSL_ENABLE_WINDOWS_ACCESS variable.
Vagrant requires this variable to be set to 1 in order to work in WSL. You can add it to your .bashrc file to get it loaded everytime you start bash, run the following and restart your bash:export "VAGRANT_WSL_ENABLE_WINDOWS_ACCESS=1" >> ~/.bashrc - Try to boot a sample vagrant project.
You can use this one: https://github.com/cepa/wordpress-boilerplate
Run:git clone https://github.com/cepa/wordpress-boilerplatecd wordpress-boilerplate vagrant plugin install vagrant-hostsupdatervagrant up
Once built you should get a WordPress installation page here: http://192.168.123.69
There are some quirks with running Vagrant in WSL though.
- Plugins like vagrant-hostsupdater editing /etc/hosts don’t affect Windows hosts file thus you’ll need to edit them manually.
- Plugin vagrant-disksize doesn’t work with WSL, need to fix command changing disk size.
So that’s it for now, I’ll describe the rest of the bullet points over next weeks, hope you like it and thanks in advance for any feedback.
If you see any issues please let me know!
WOW! This article has made its way to the Hacker News front page, thanks all for upvoting!
Here is the following discussion on Hacker News https://news.ycombinator.com/item?id=16351716


